Step One
Create Meta Pixel & Access Token
1.A
Create the Pixel — Events Manager
- Go to Meta Events Manager
- Click "Connect Data Sources" → "Web" → "Meta Pixel"
- Enter pixel name:
Your Model - OnlyFans - Copy your Pixel ID (example:
1881842942413828) — keep it for Step 2
1.B
Add an App — Business Manager
- Go to Business Settings → Accounts → Apps
- Click "Add" → "Create a new app ID" (or connect an existing one)
- App type: "Business"
- Name it (e.g.
Your Model CAPI) and finalize creation
The app is what the System User token will be issued against.
1.C
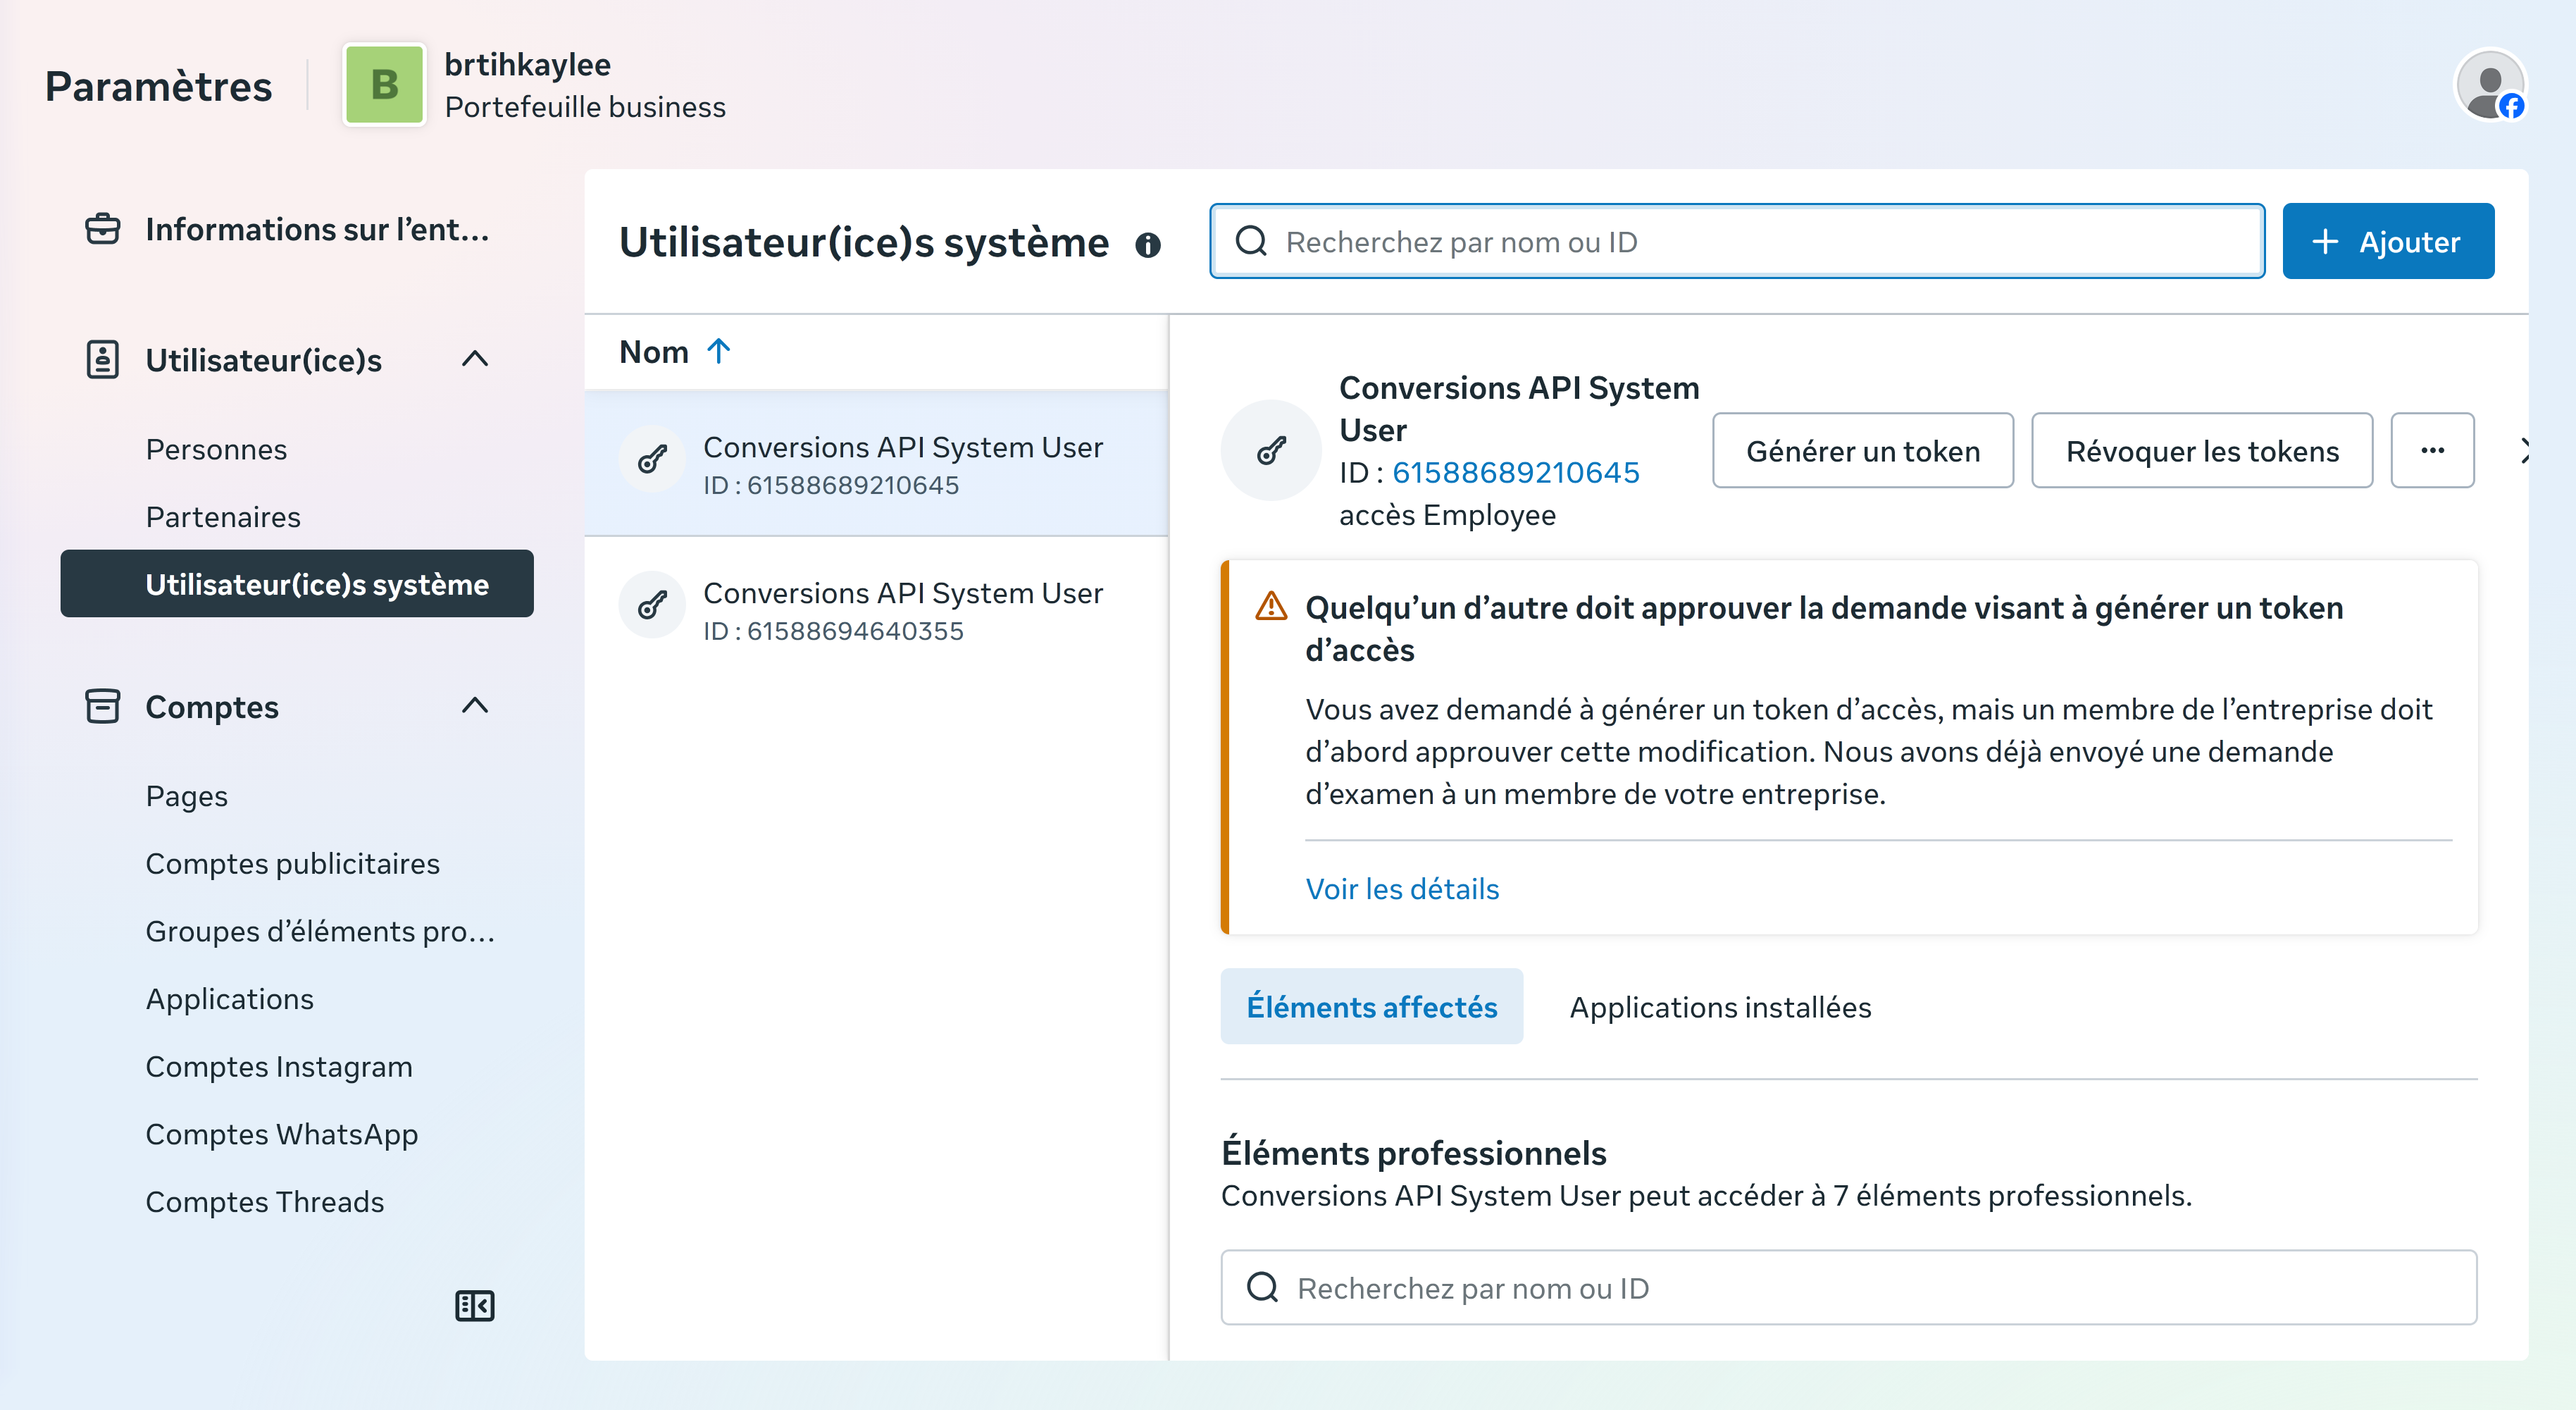
Create a System User
- Go to Business Settings → Users → System Users
- Click "Add" → name it
Conversions API System User→ role: Employee
1.D
Assign assets to the System User
Open the System User and click the ··· menu → "Add Assets" (FR: Affecter des éléments).
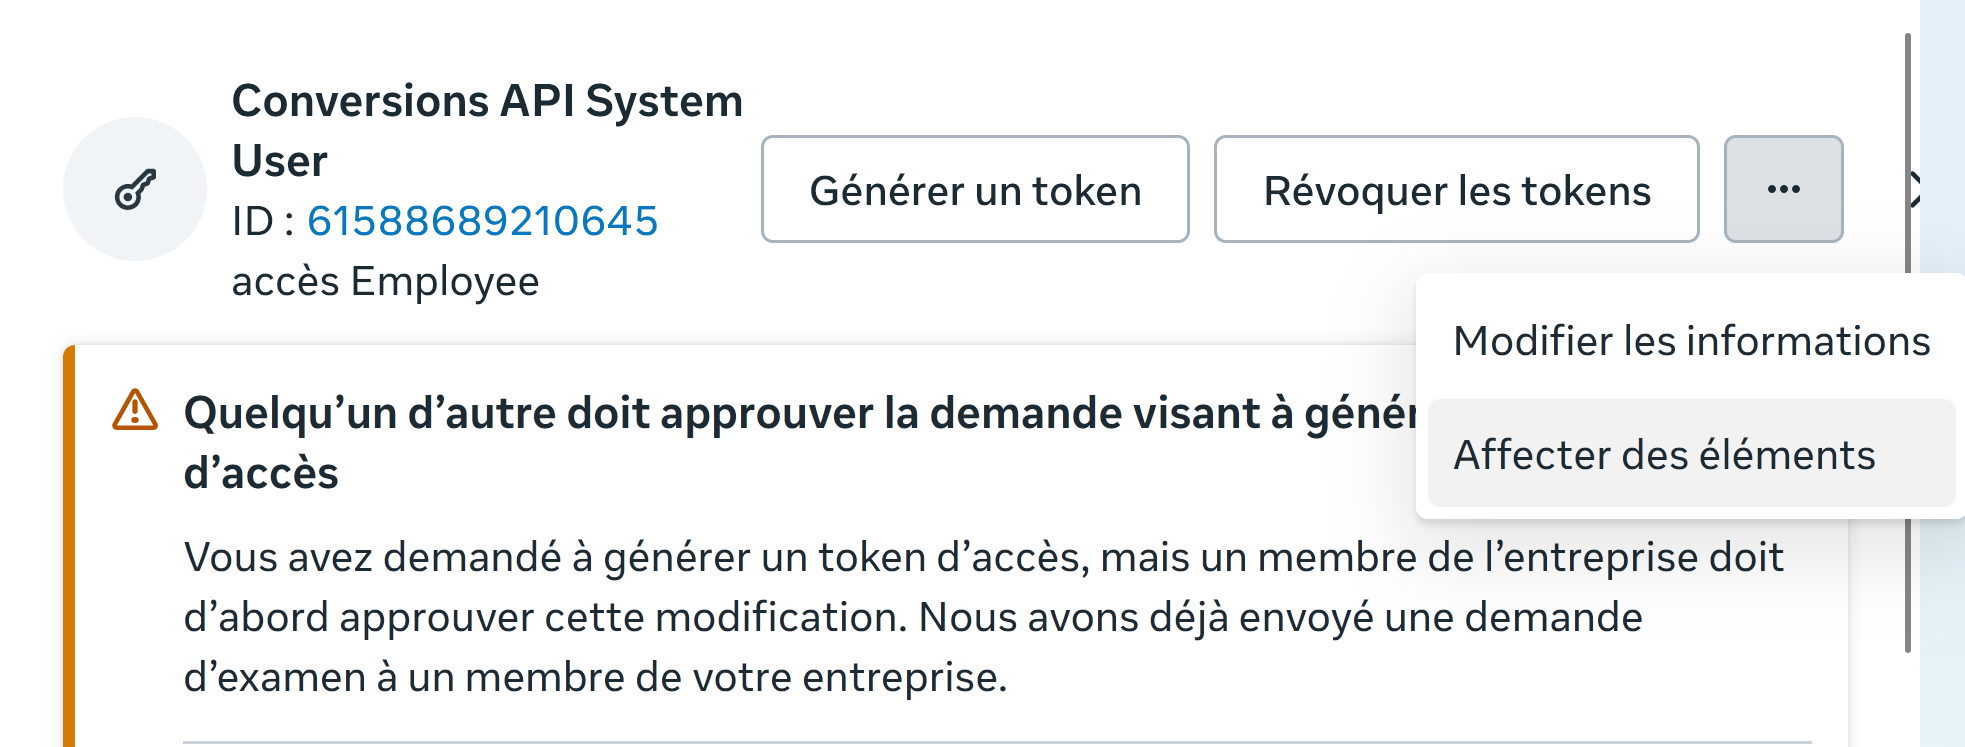
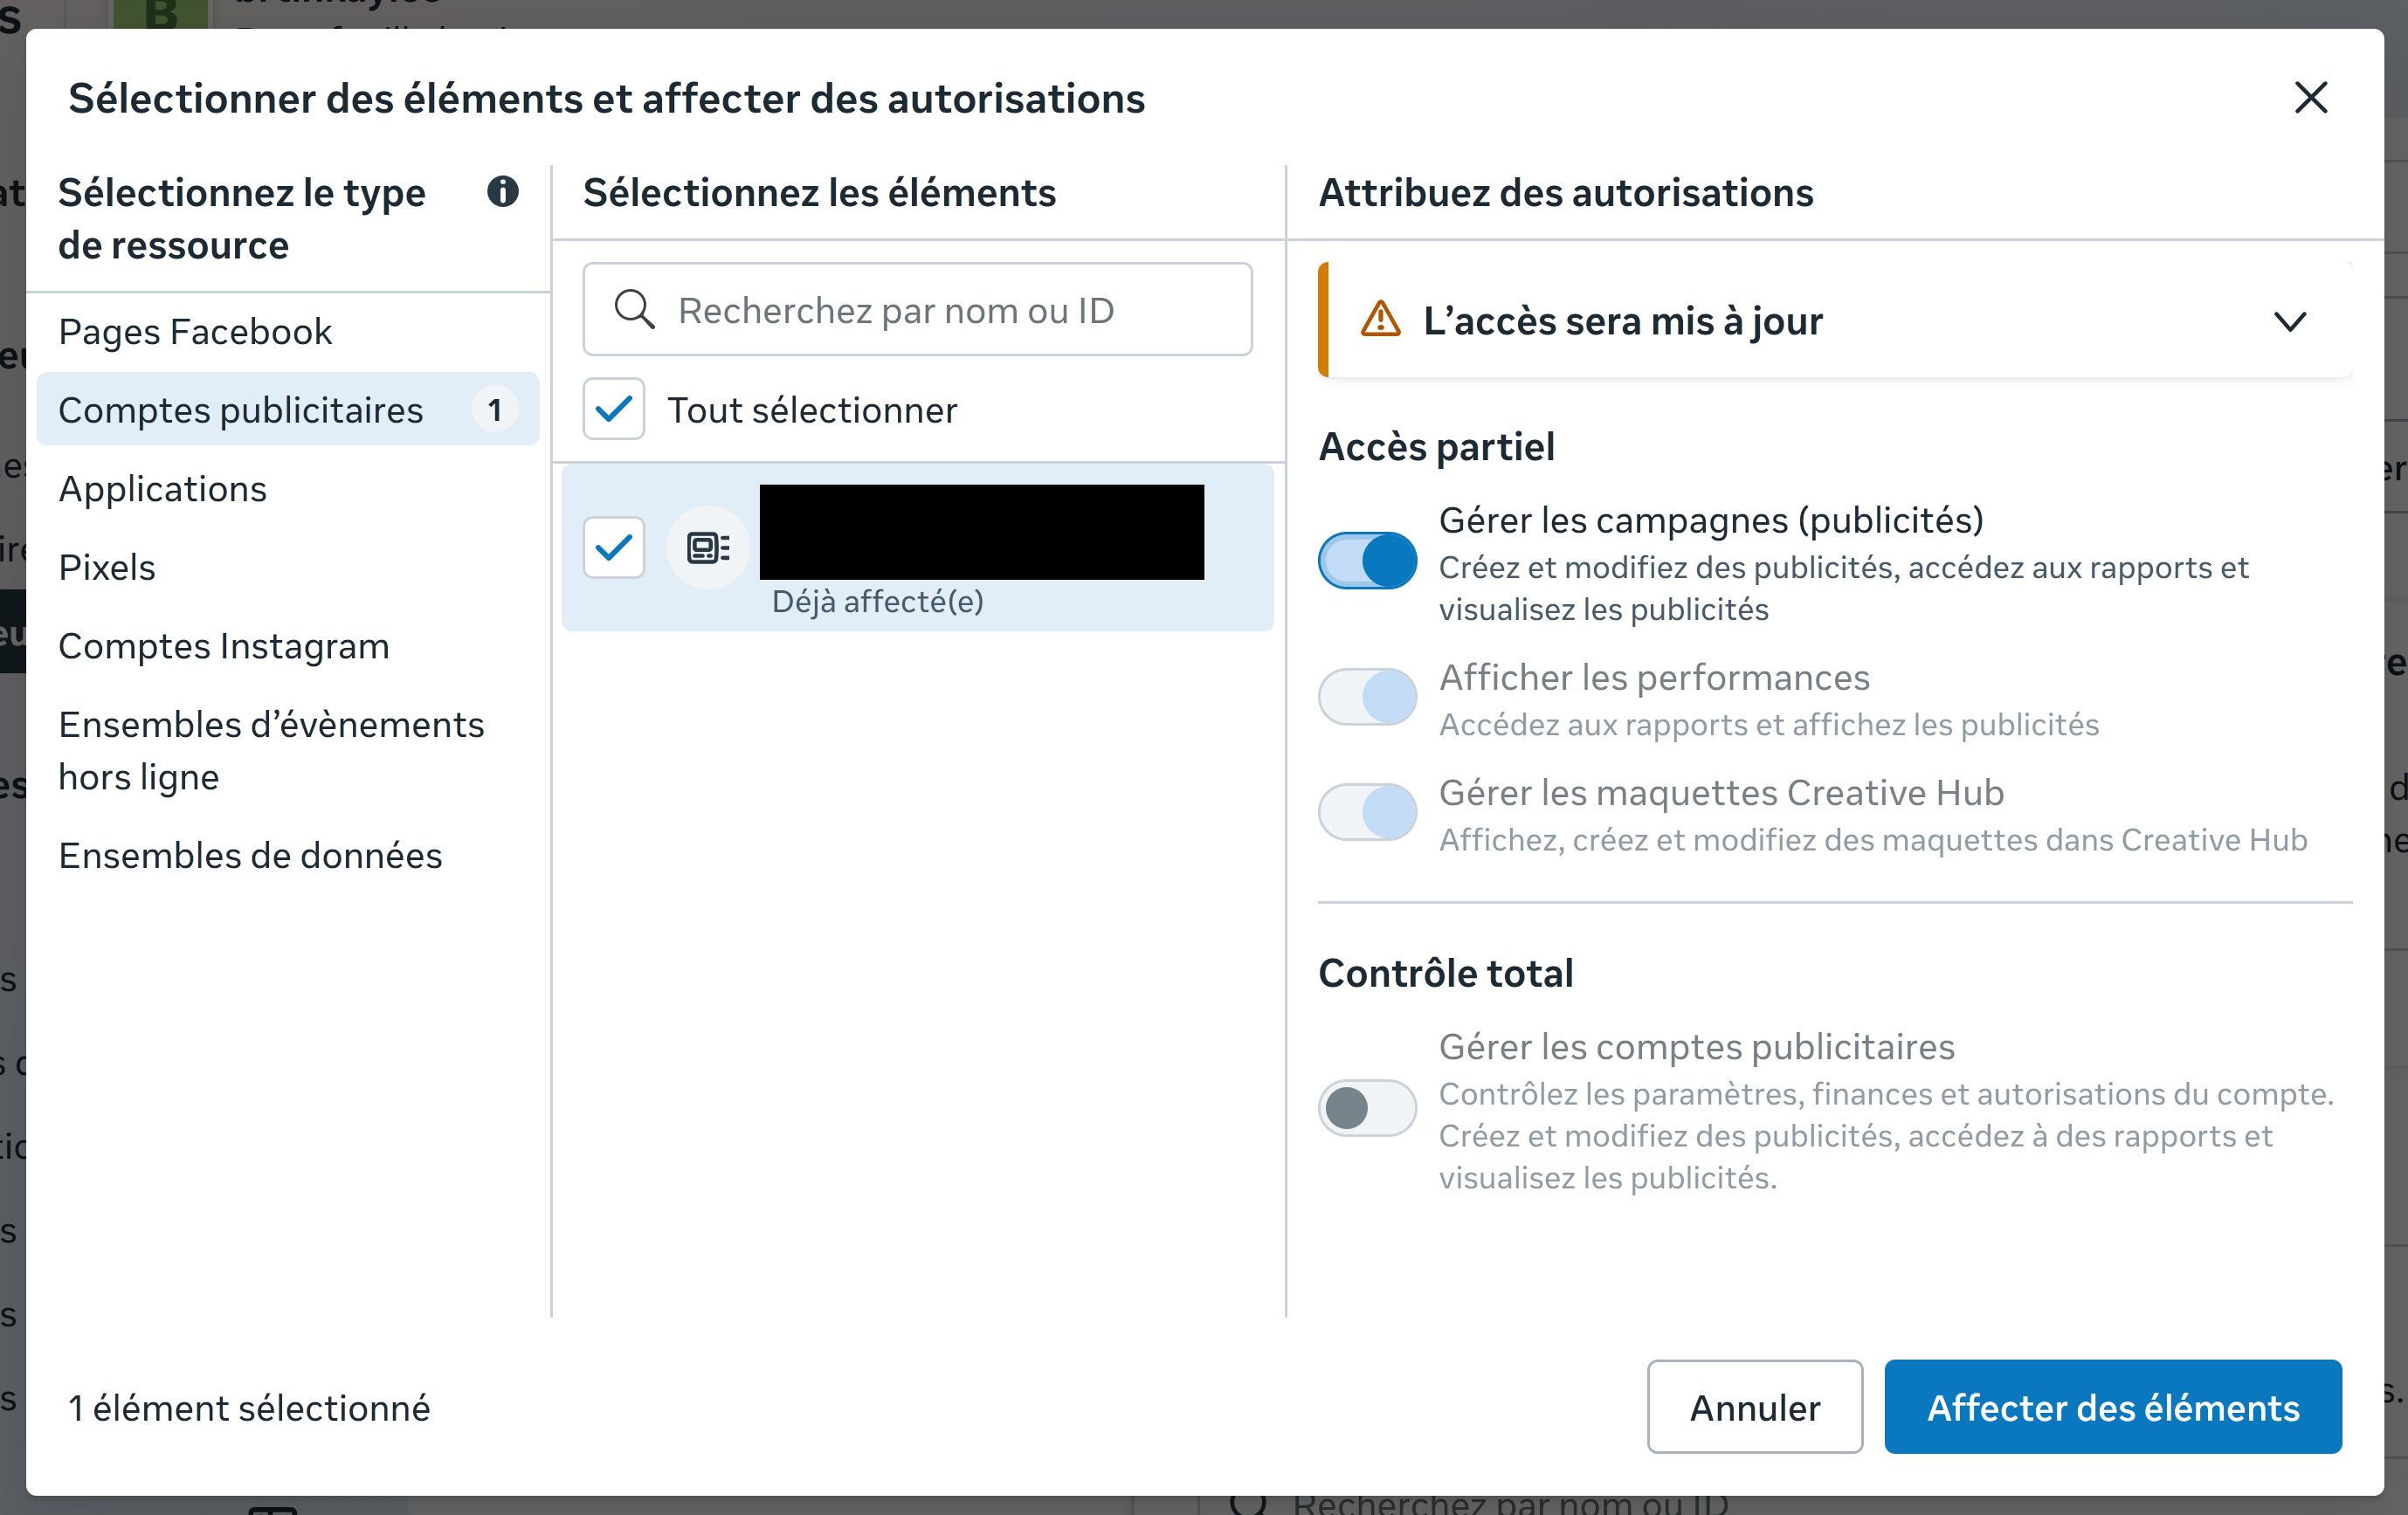
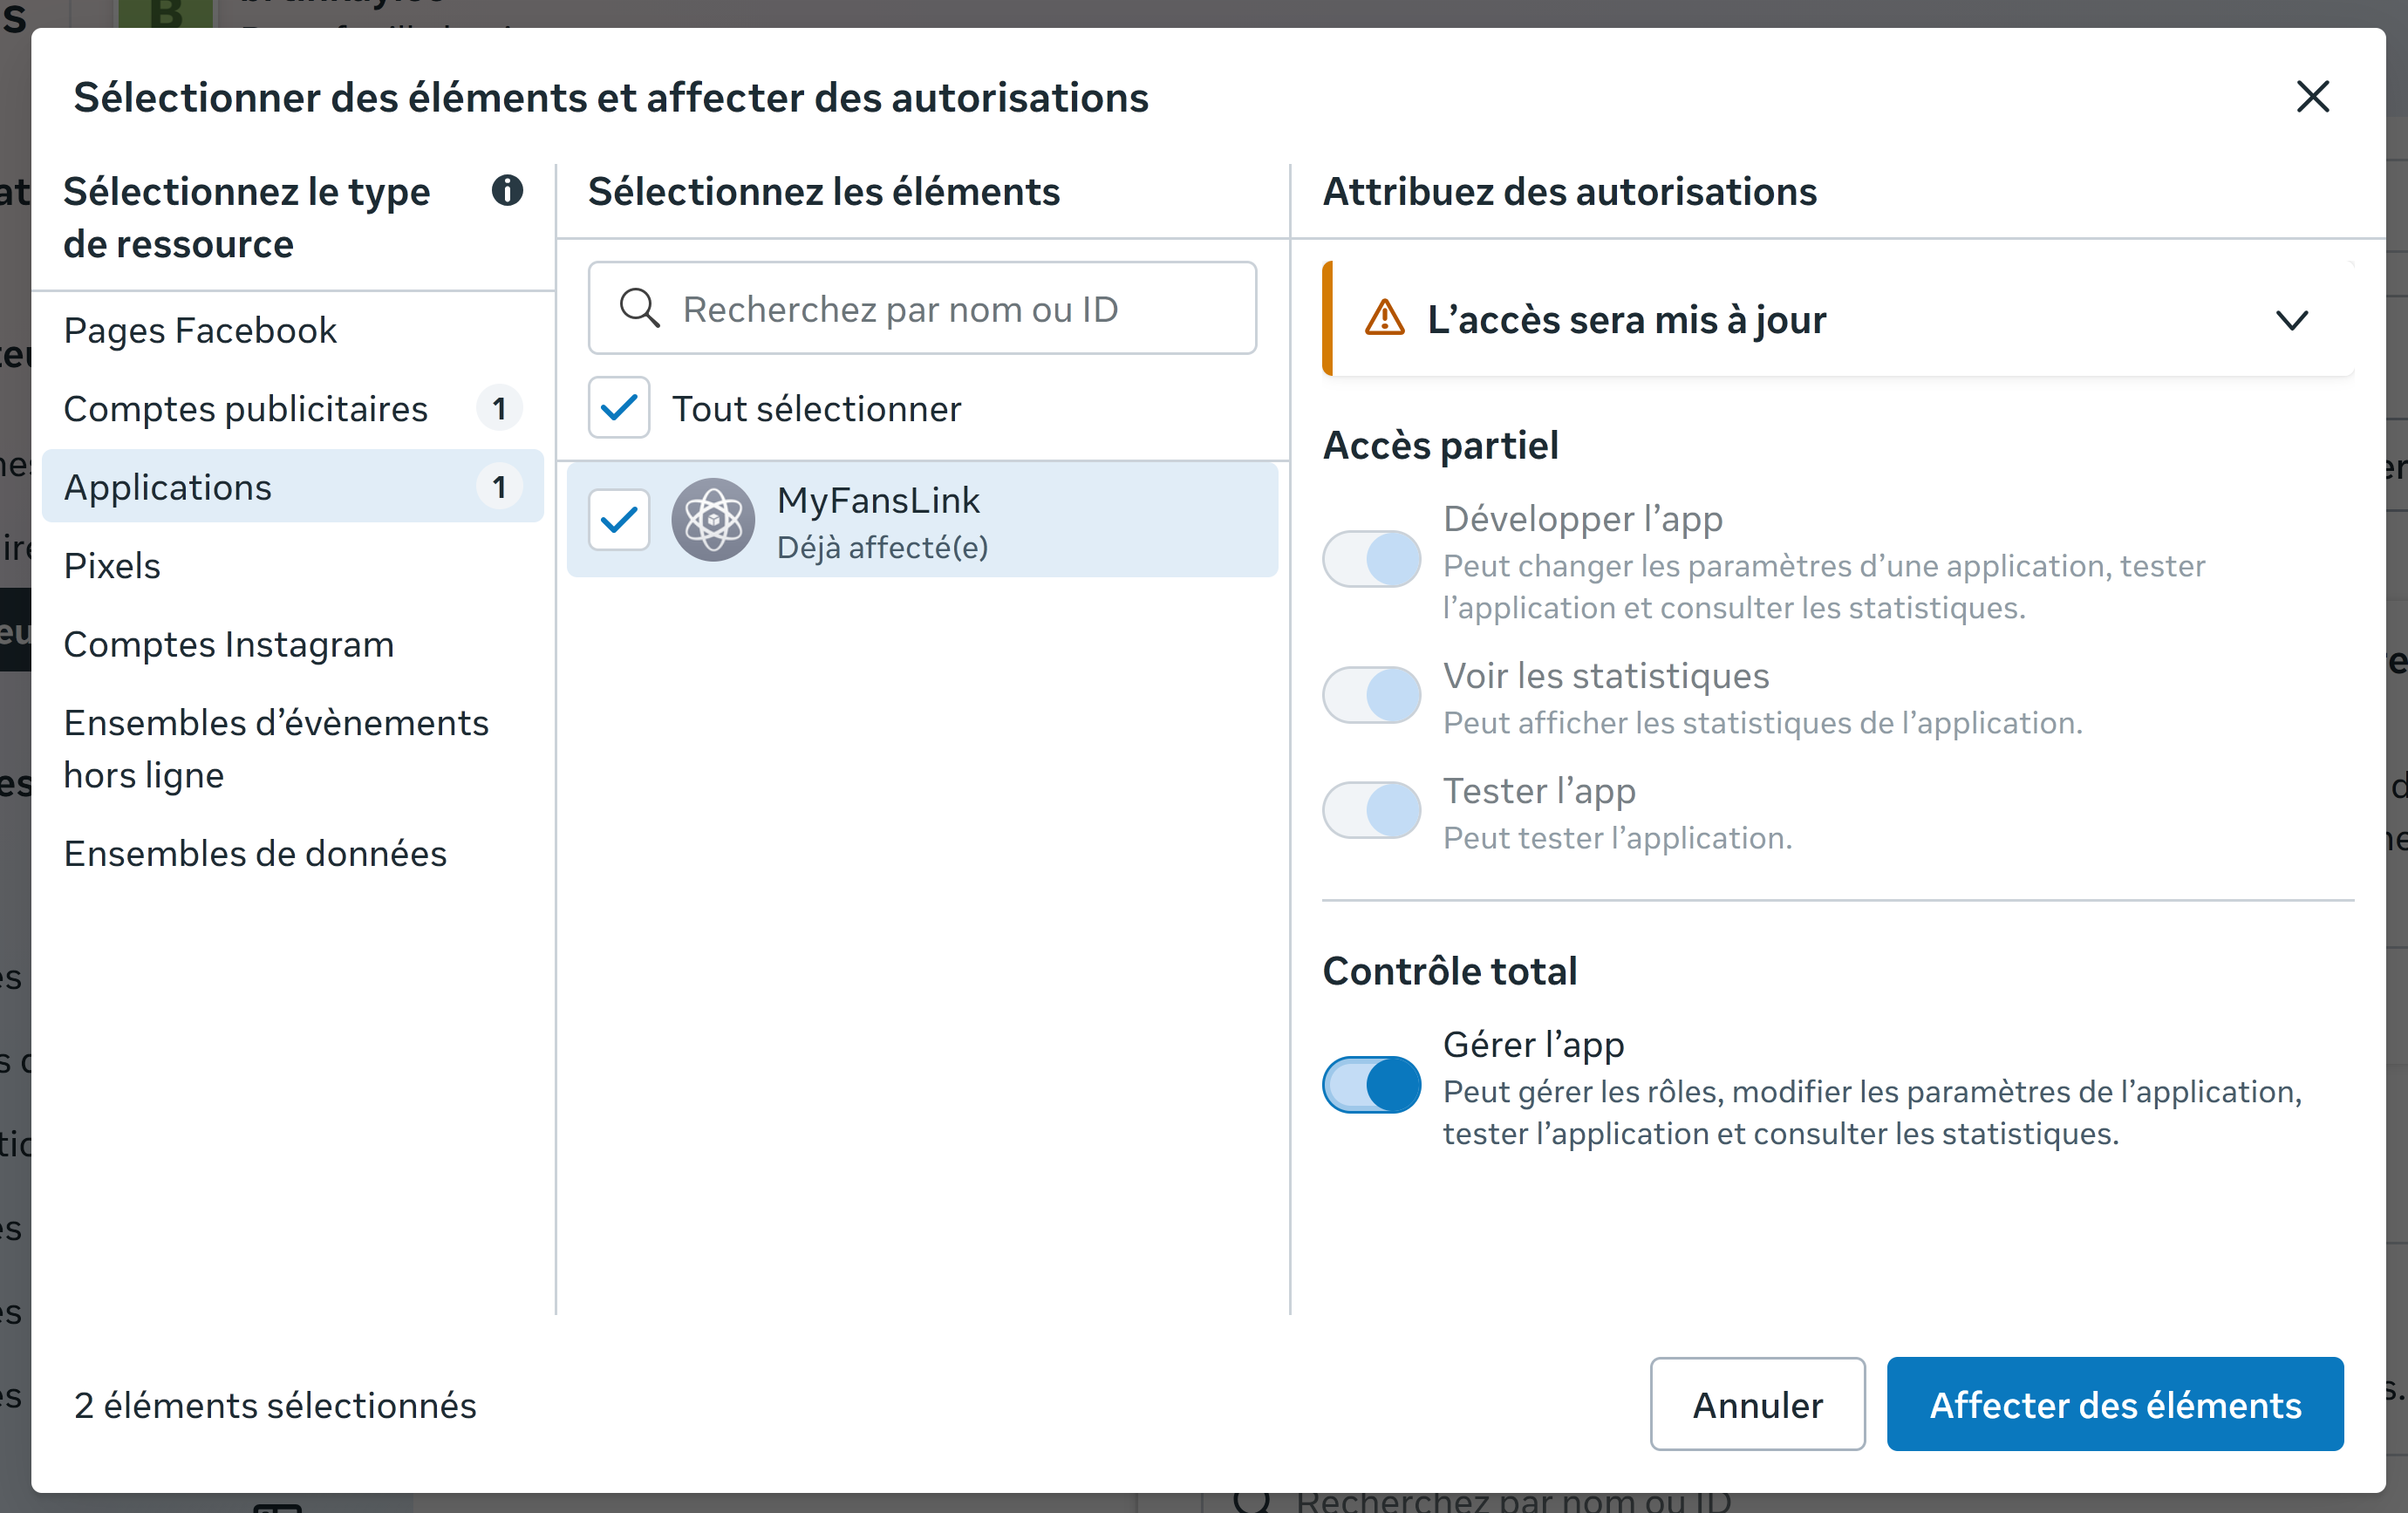
Assign the following three asset types:
Pick the ad account you'll run ads from → Partial access → "Manage Campaigns" (FR: Gérer les campagnes).
Pick the app from 1.B → Full control → "Manage app" (FR: Gérer l'app).
Pick the Pixel from 1.A → Full control → "Manage the event dataset" (FR: Gérer l'ensemble de données d'évènements).
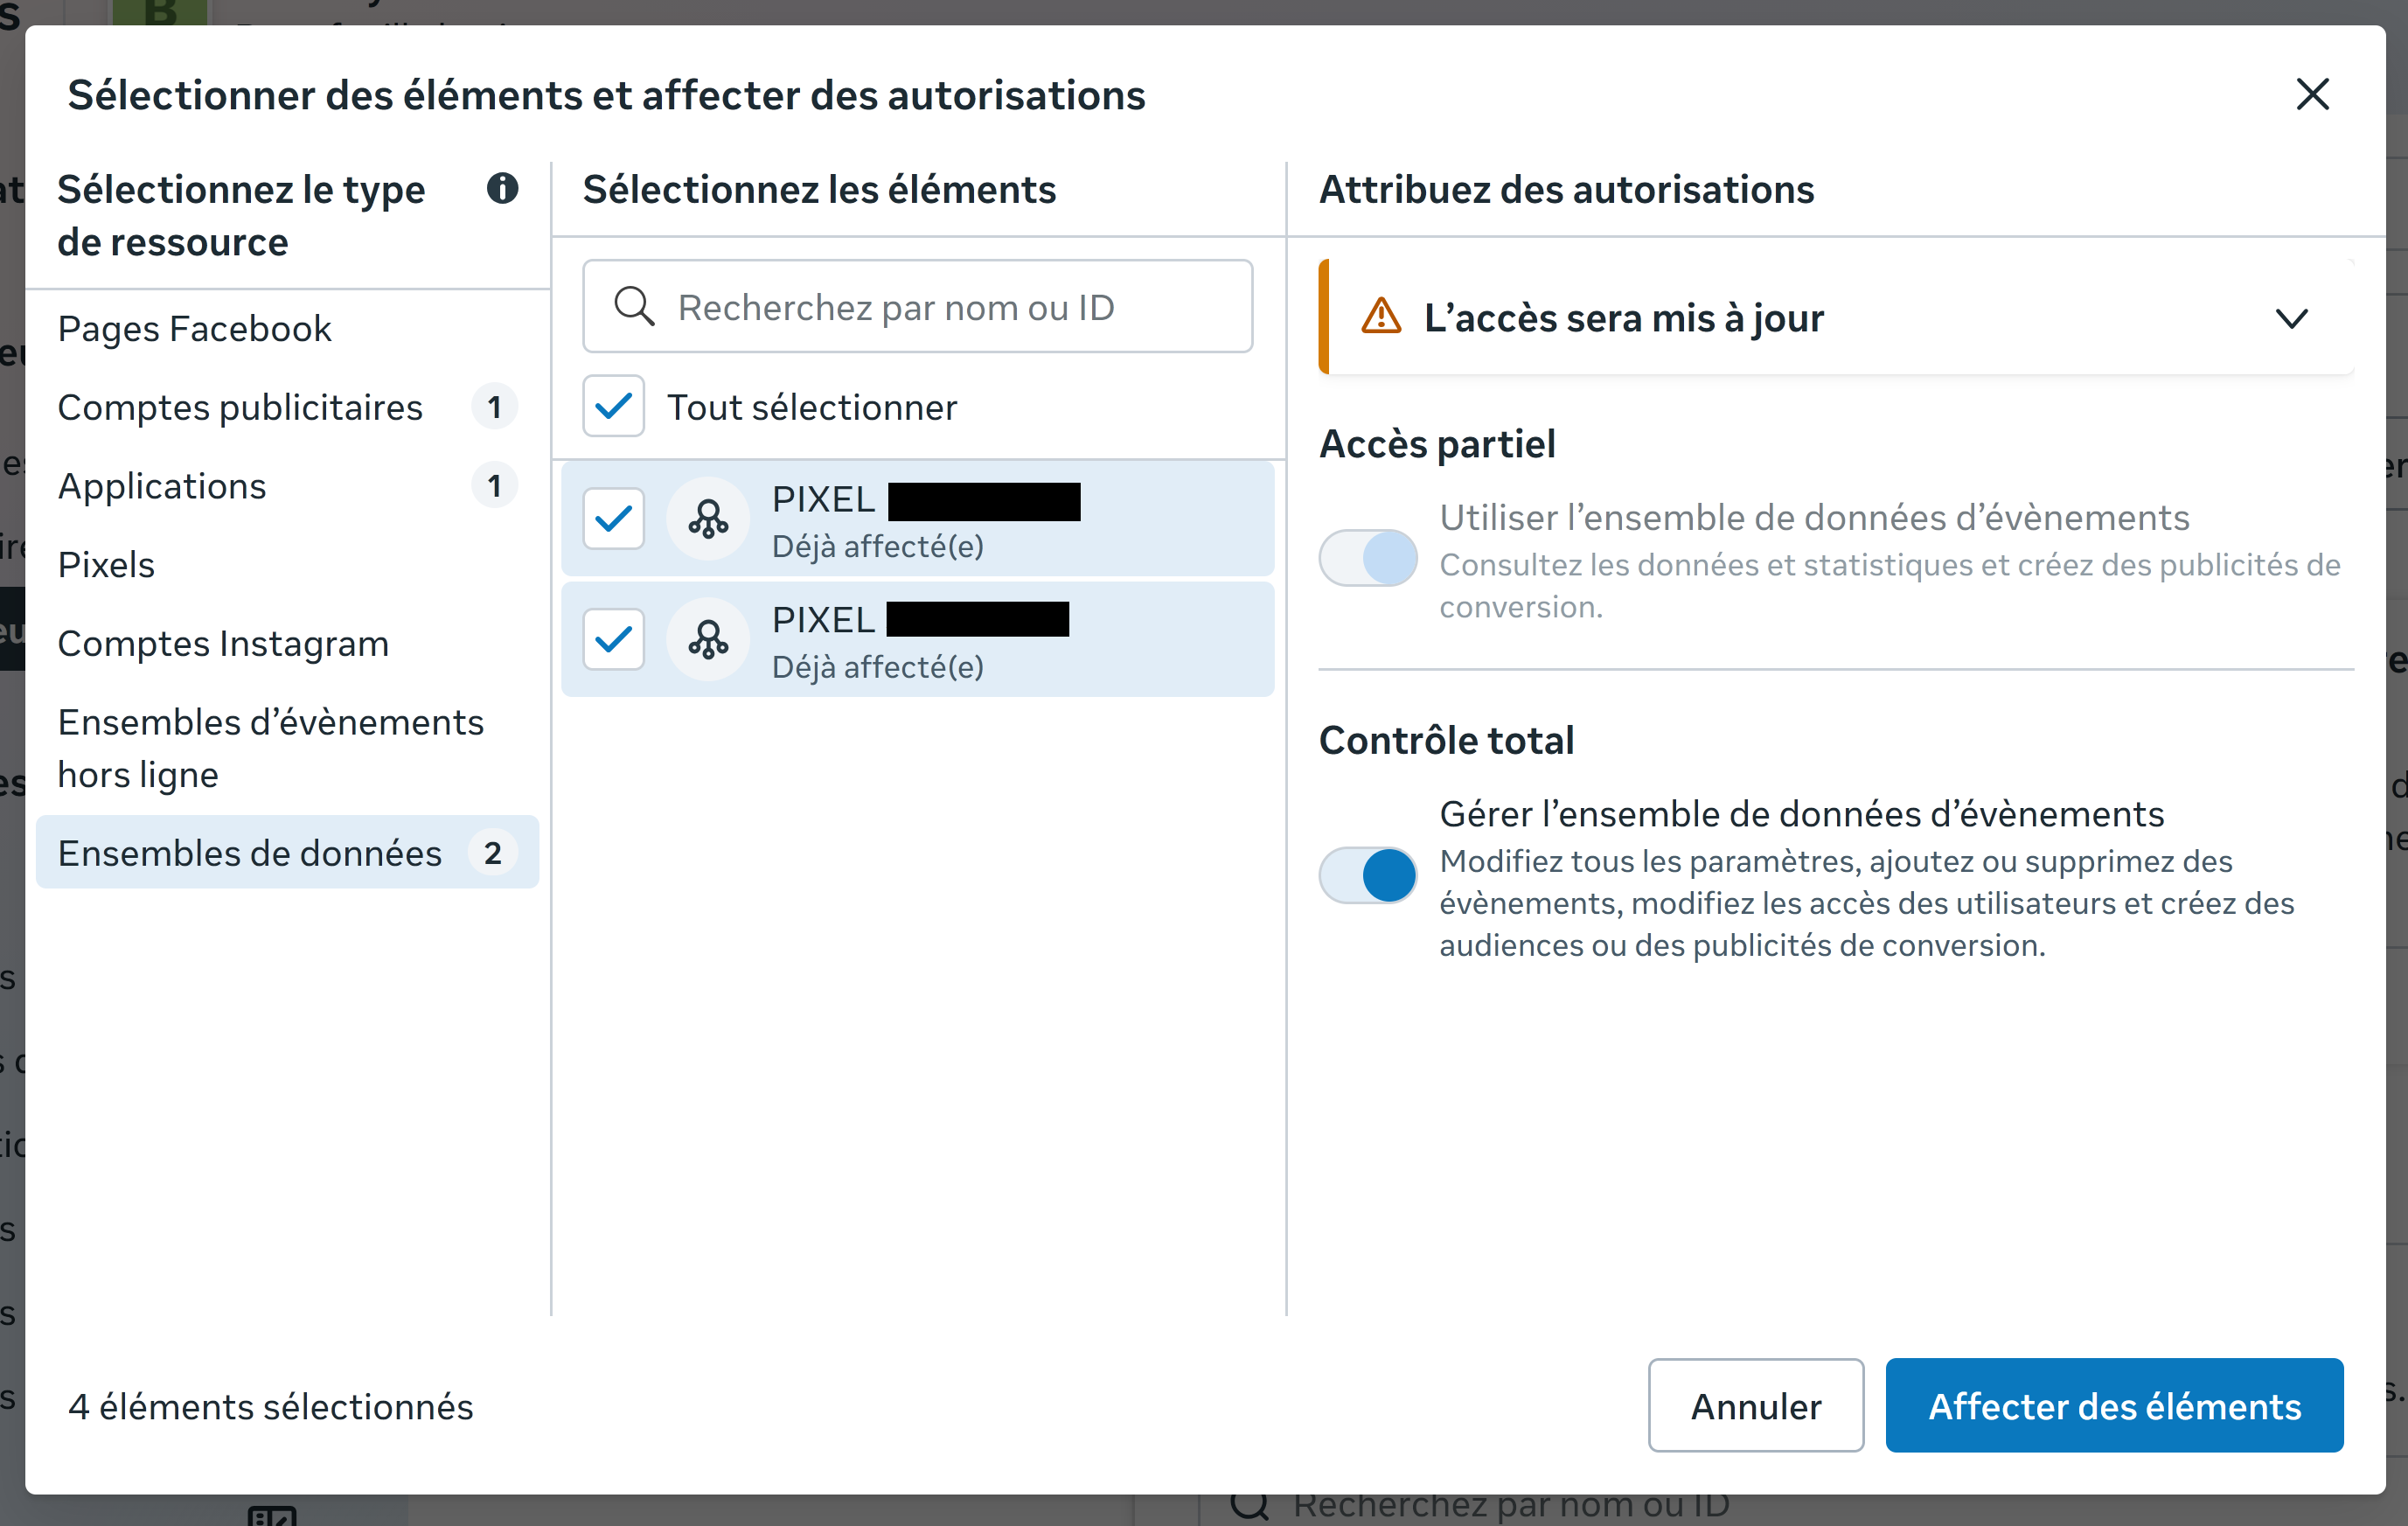
Note: Meta merged Pixels into "Datasets" — same thing, new name.
1.E
Generate the Access Token
Back on the System User page, click "Generate New Token" (FR: Générer un token) and walk through the 3 steps:
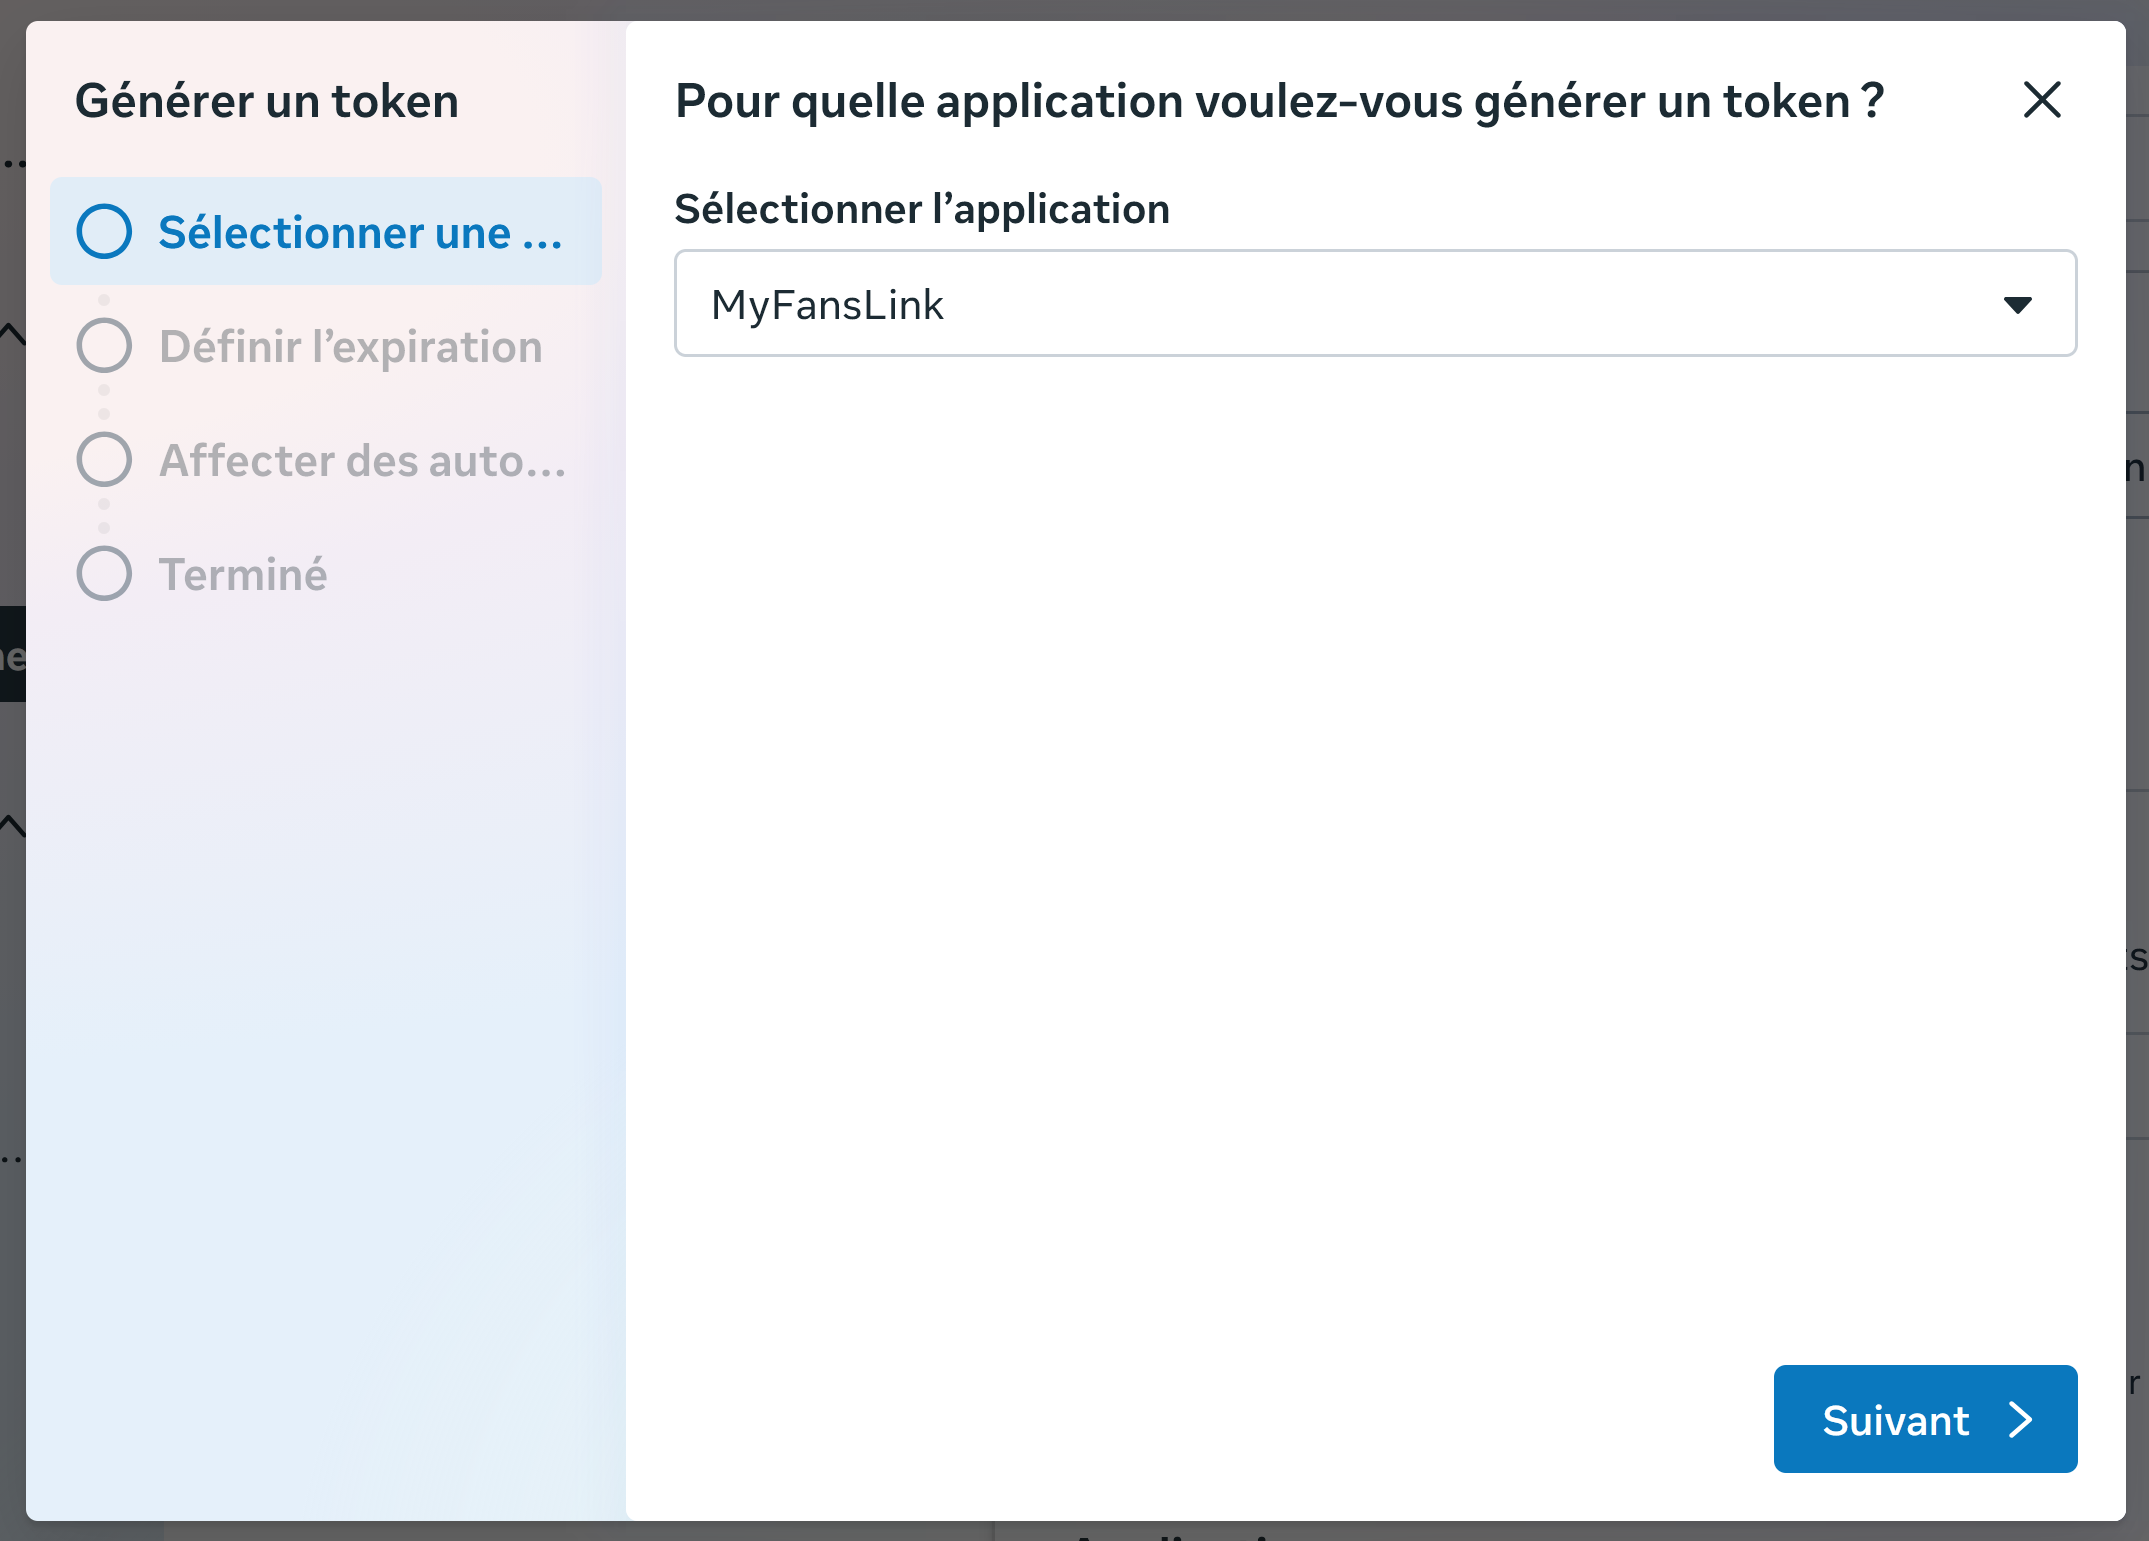
Pick the app from 1.B (e.g. MyFansLink).
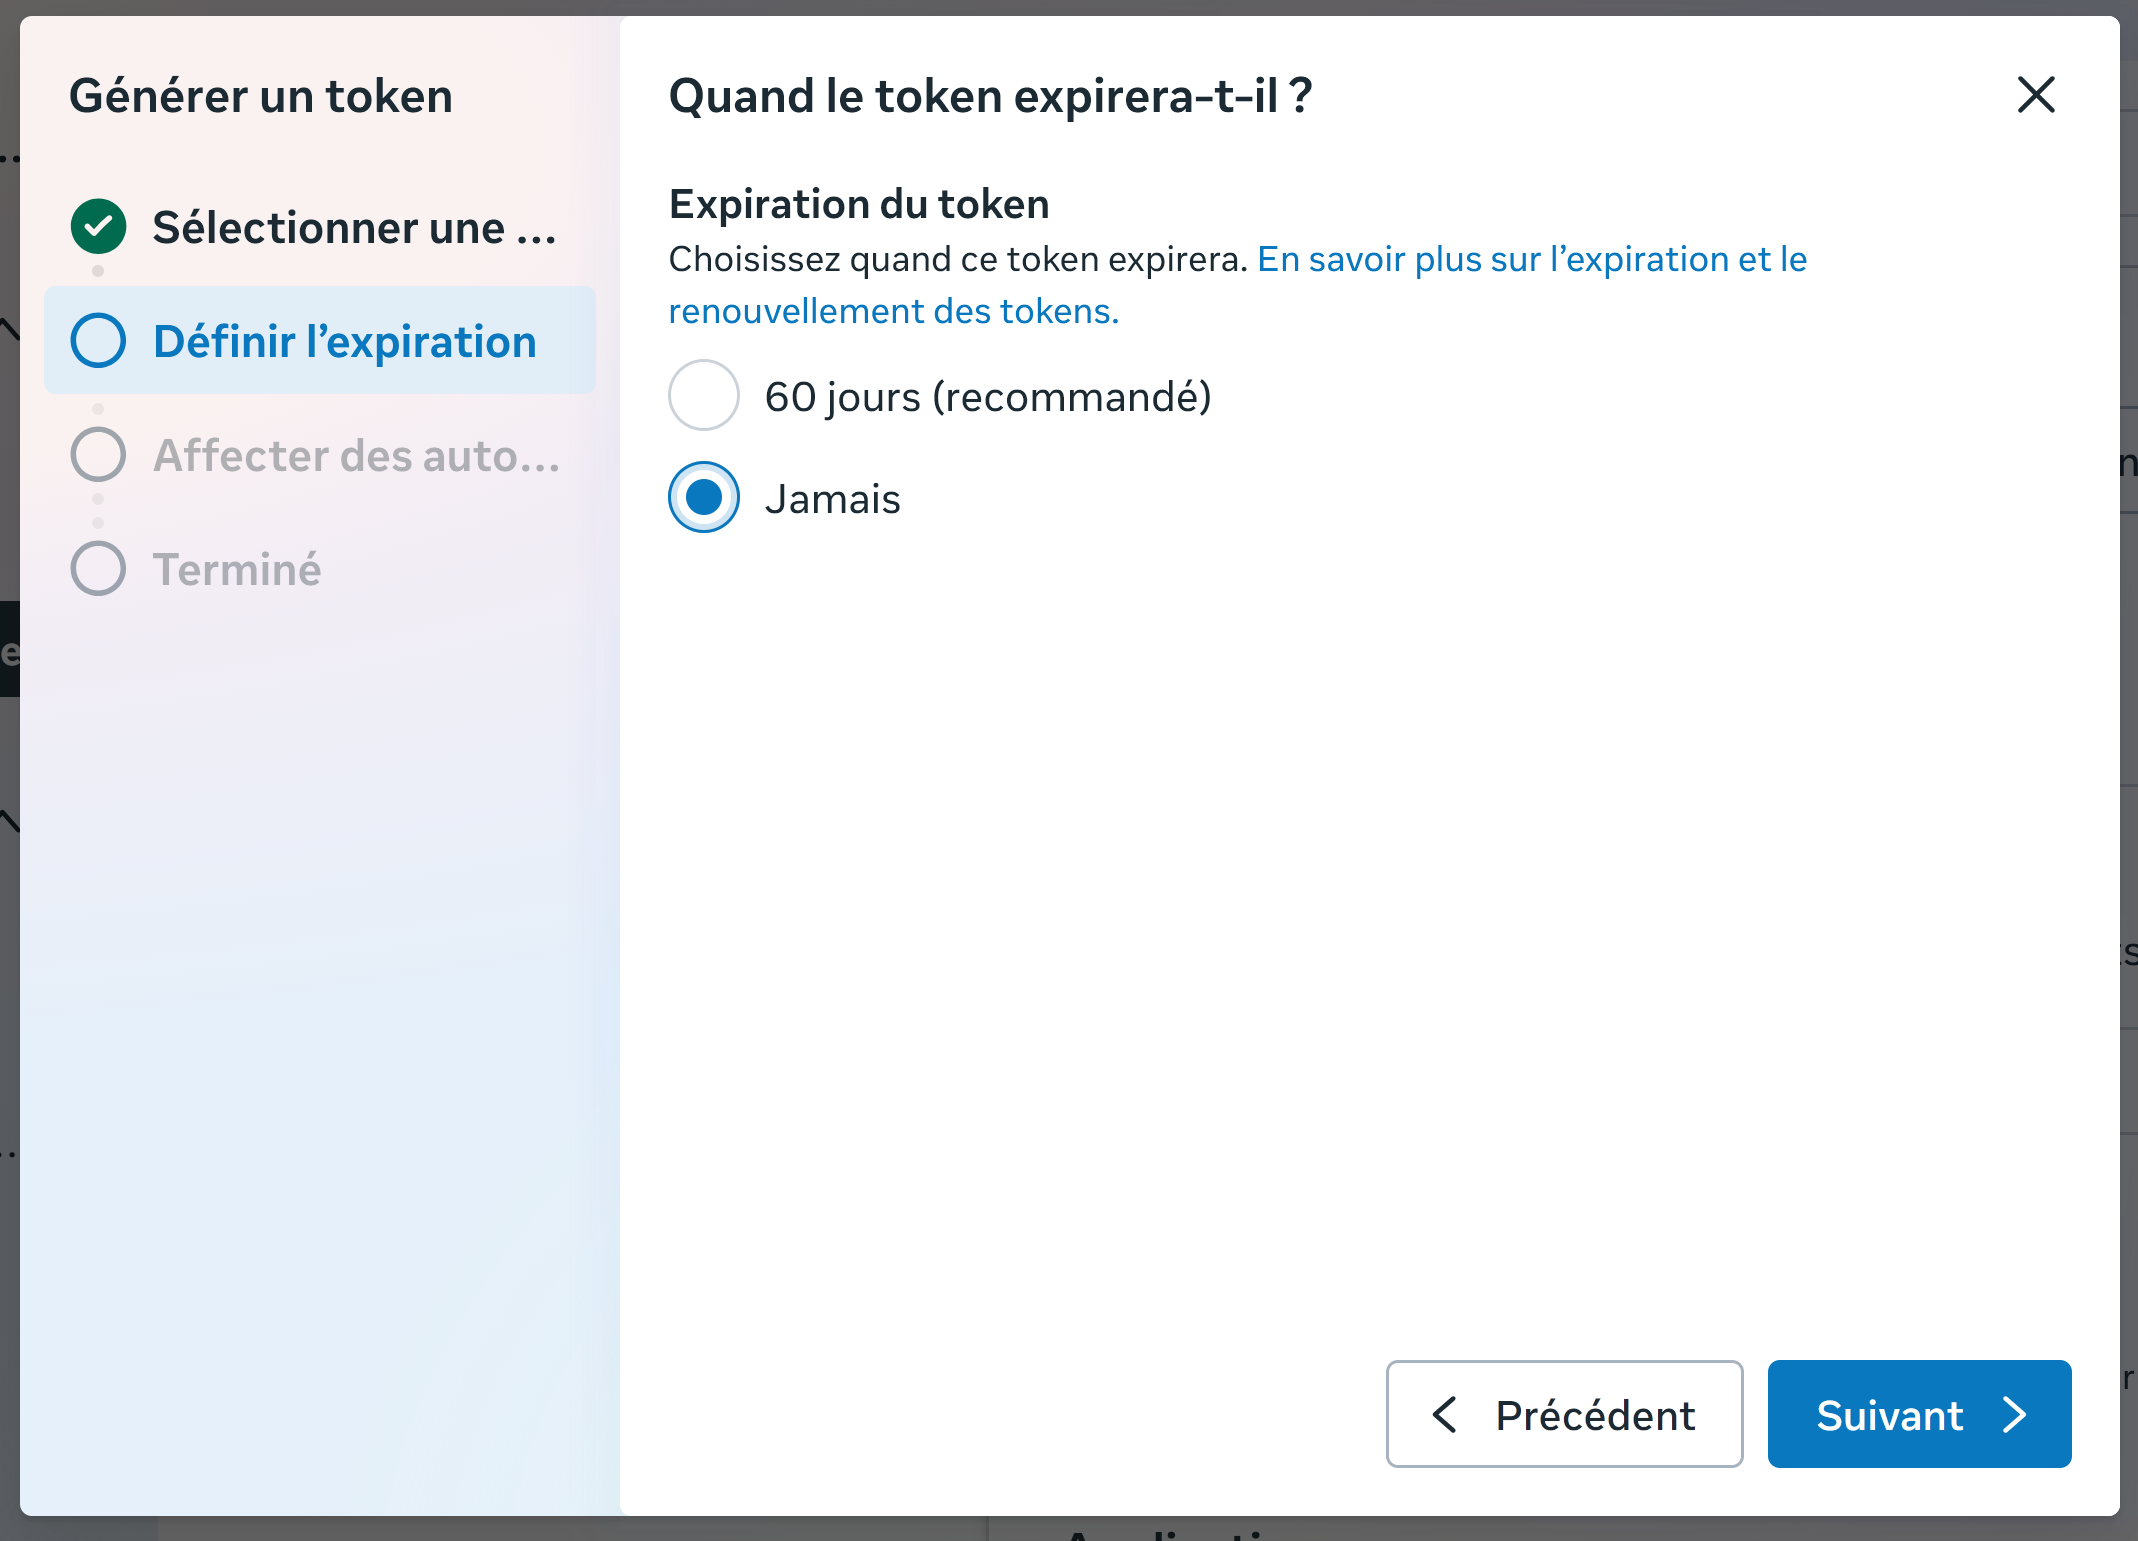
Choose "Never" (FR: Jamais) — recommended for server-to-server CAPI.
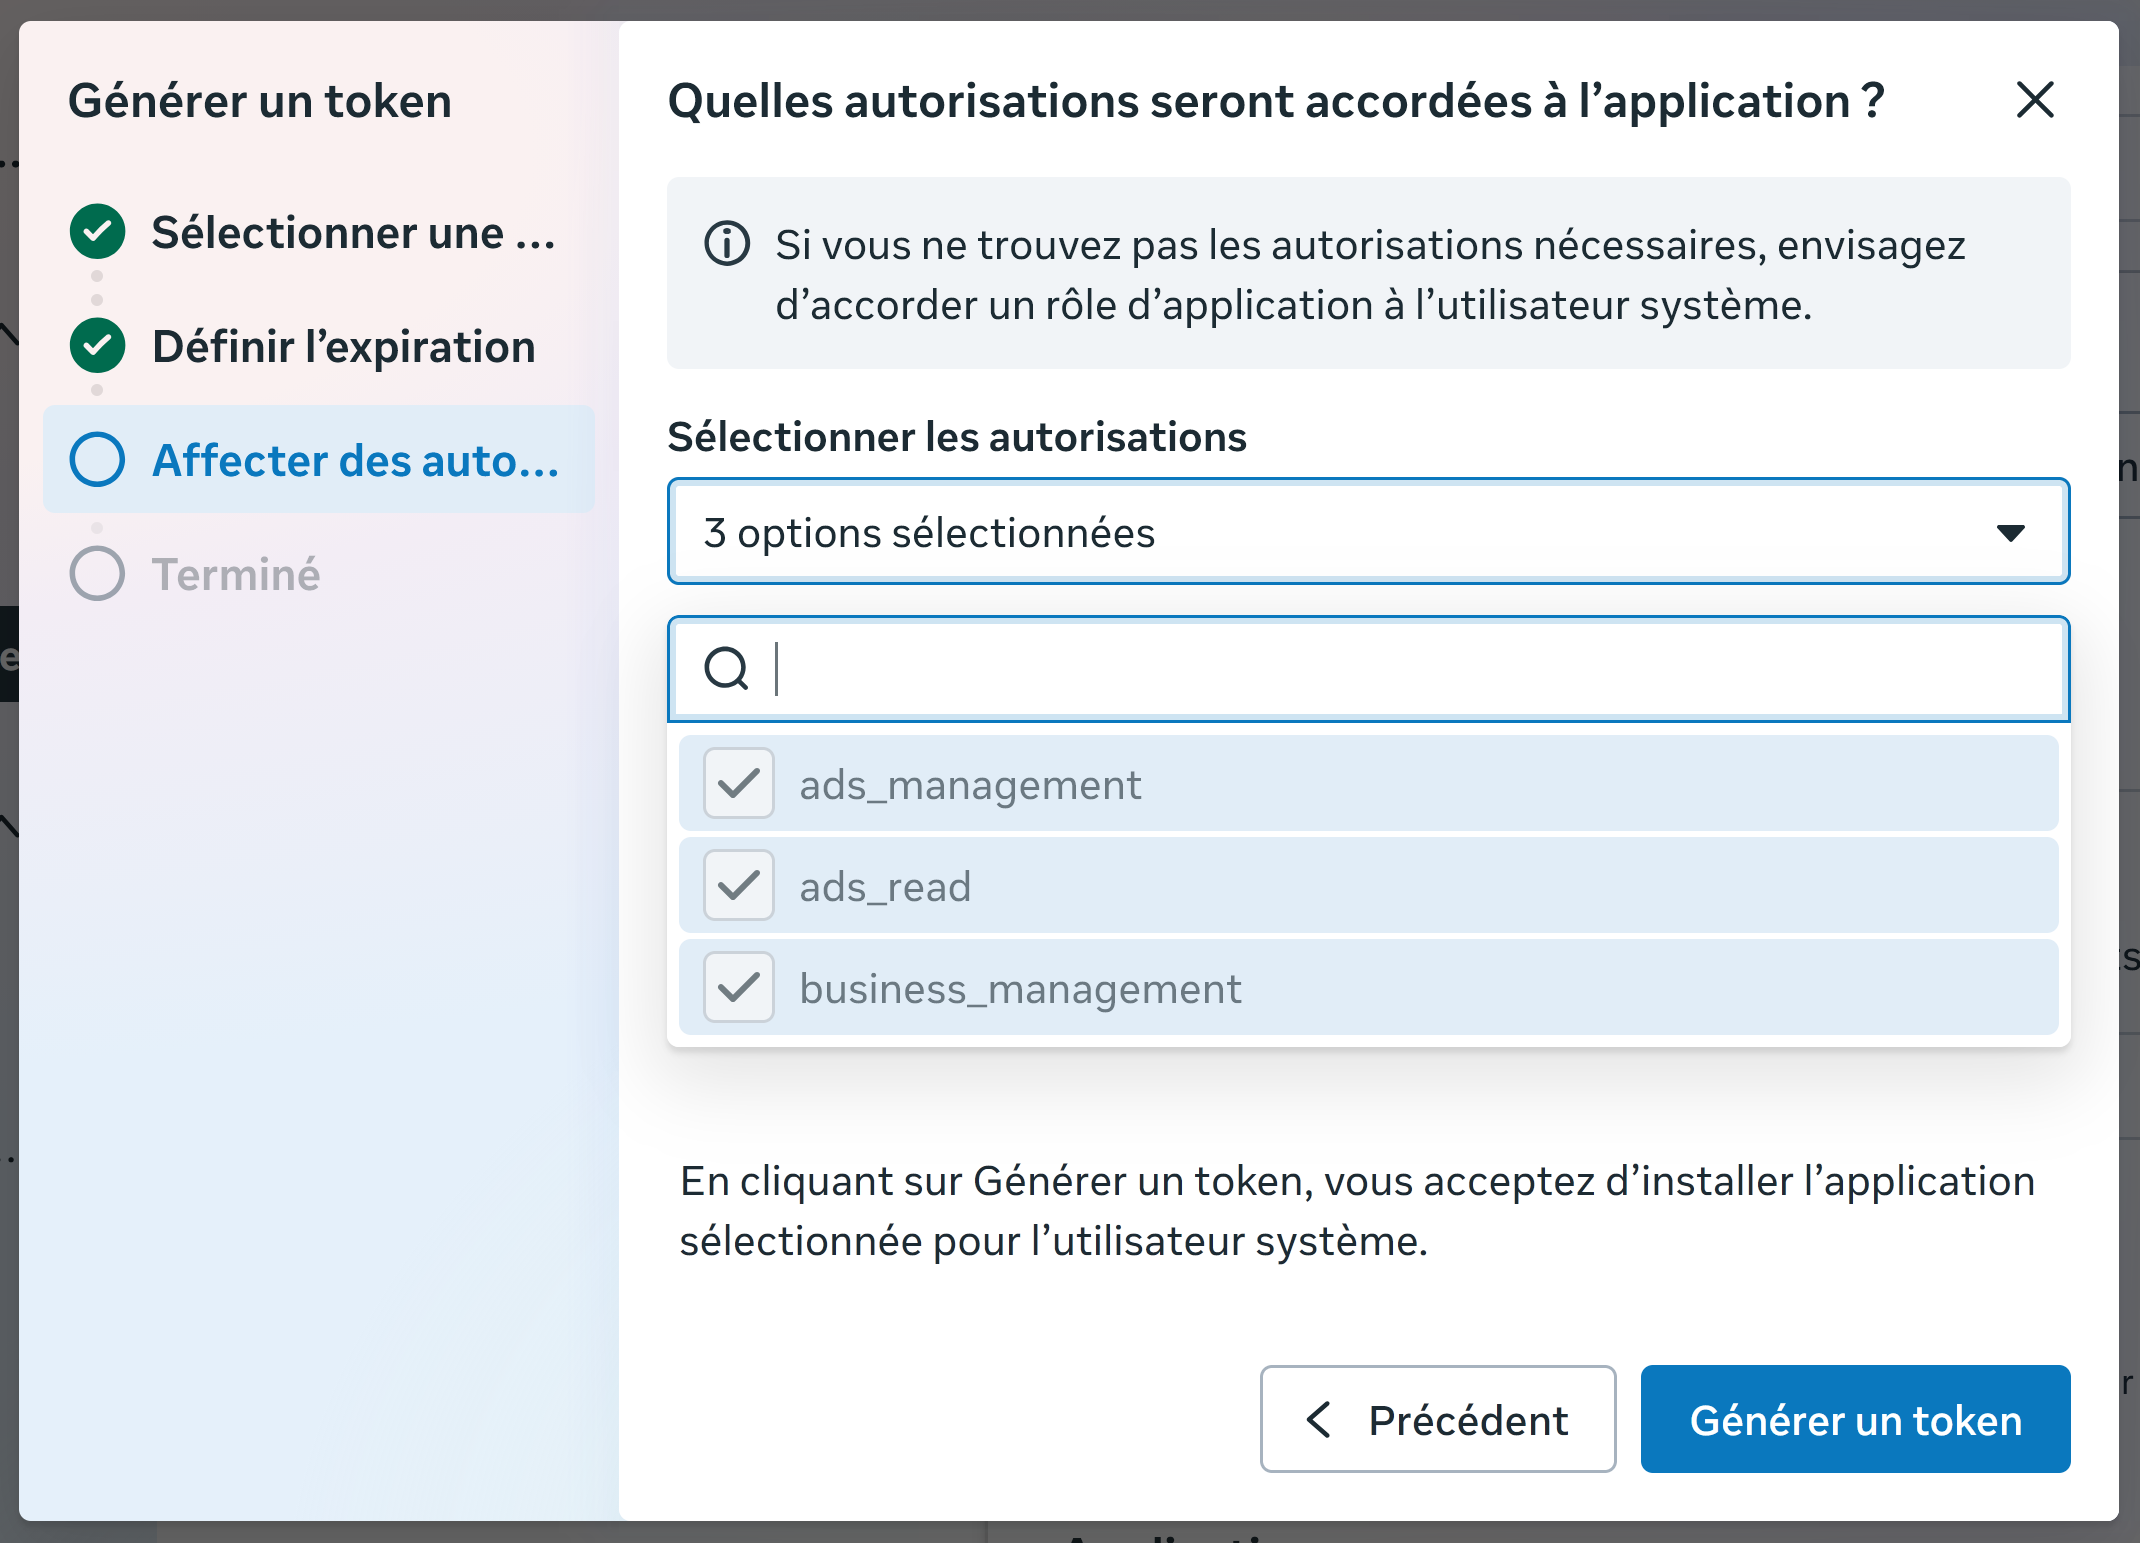
ads_managementads_readbusiness_management
EAA...) — keep it for Step 2 of this guide. The token is shown only once. Store it safely.
Step Two
Add Configuration to MyFansLink
Add your pixel credentials to this platform:
- Go to the Settings tab
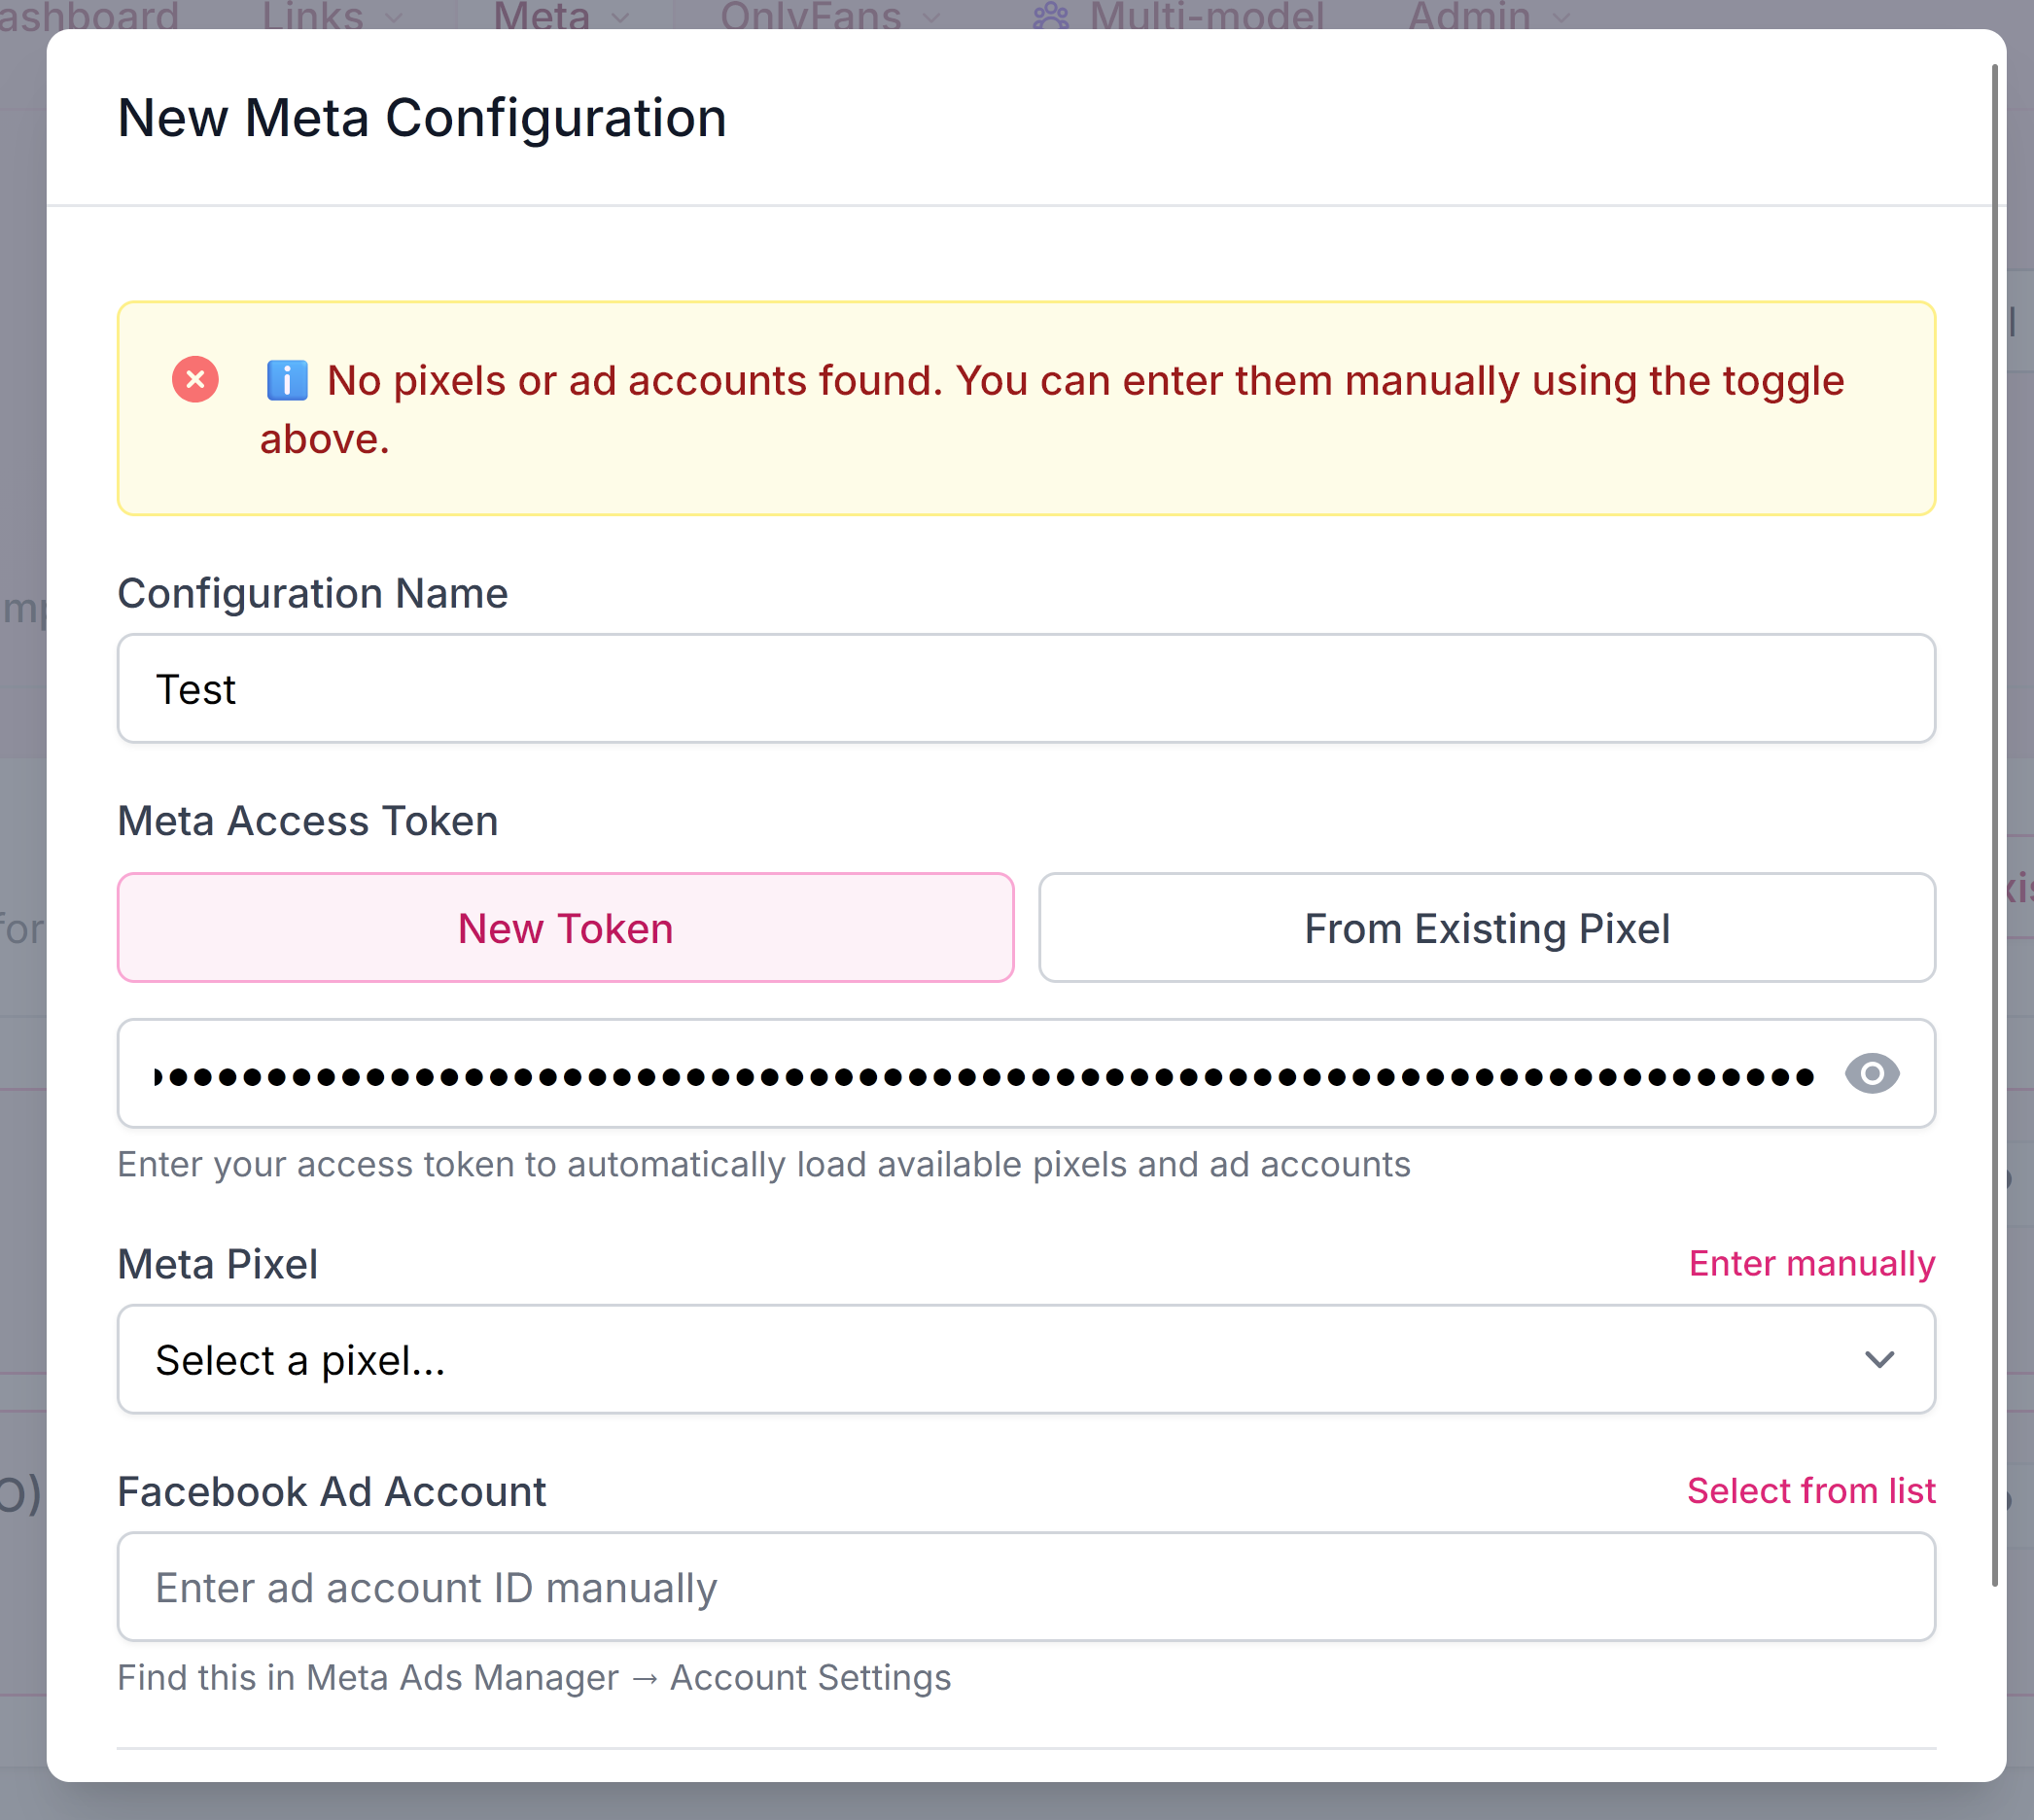
- Click "New Configuration"
- Fill in the form:
- Name: Something descriptive (e.g., "Your Model Main Pixel")
- Access Token: Keep "New Token" selected and paste the access token from step 1.E — MyFansLink will auto-load your available pixels & ad accounts
- Meta Pixel: Pick the pixel from step 1.A in the dropdown (or use "Enter manually" to paste the Pixel ID)
- Facebook Ad Account: (Optional) "Select from list" or paste manually as
act_123456789
- Click "Save Configuration"
- The configuration will be automatically linked to this creator
Step Three
Create Facebook / Instagram Ad Campaign
In Meta Ads Manager
- Click "Create" → Choose objective: "Sales" (formerly "Website Conversions")
- Campaign name:
Your Model - Acquisition(Phase 1) orYour Model - Scale(Phase 2) - Choose buying type: "Auction"
- Conversion location: "Website"
- Select your Pixel ID (the one you created in step 1)
- Budget: Start with $20–50/day minimum
- Audience: Start broad (Men 18–45 in your target country), let Meta optimize
- Placements: "Advantage+ Placements" (automatic)
The conversion event and performance goal change depending on your maturity. Pick the column that matches you.
Subscribe- ⭐ Conversion event:
Subscribe(this is the key!) - Performance goal: "Maximize number of conversions"
Purchase (ROAS)- ⭐ Conversion event:
Purchase - Performance goal: "Maximize value of conversions" (ROAS)
- Upload your creative (image/video)
- Primary text: Write compelling copy
- Headline: Clear value proposition
- Destination: Your landing page URL
https://myfansl.ink/your-page
- Call to action: "Subscribe", "Contact Us" or "Send Message"
Subscribe while you're under 50 Purchase events/week, then switch to Purchase with value optimization once Meta has enough signal. The wrong event = the algorithm bids on the wrong people.
Step Four
Monitor & Optimize
After launching your campaign:
-
Wait for the Learning Phase (7-10 days):
- Meta needs ~50 "Subscribe" events per week to optimize
- Don't make changes during learning phase
- Campaign status will show "Learning" → "Active"
-
Verify Events in Meta Events Manager:
- Check that you're receiving PageView,
landing_page_button_clicked, Subscribe, Lead, Purchase events - Event Match Quality should be 8.0+
- Look for "Conversions API" badge on events (server-side working)
- Check that you're receiving PageView,
-
Track Performance Here:
- Overview tab — See ROI, ROAS, conversions
- Campaigns tab — View campaign performance
- Events tab — Monitor pixel events
-
Optimize After Learning Phase:
- Increase budget by max 20% every 3 days
- Test new creatives (images/videos)
- Duplicate winning ad sets
- Create Lookalike Audiences from subscribers
MyFansLink automatically sends these events to Meta.
| Event | When Fired | Intent | Use For Optimization |
|---|---|---|---|
PageView |
User lands on your page | Low | Awareness campaigns |
landing_page_button_clicked custom |
User clicks the OnlyFans button on the landing — leaving for OF | Medium | Mid-funnel signal (anonymous click-out) |
Subscribe |
User subscribes on OnlyFans | High | ✓ Recommended for Phase 1 (cold start) |
Lead |
Fan qualified by chatter (display_name set) — post-subscription | High | Mid-funnel optimization (qualified subs) |
Purchase |
Subscription payment / first paid action confirmed | Highest | ✓ Recommended for Phase 2 (value / ROAS) |
Check Meta's Conversions API documentation or review your pixel configuration in the Settings tab.